How to Connect Humidifier to Furnace: A Step-by-Step Guide
Connecting a humidifier to your furnace can change the comfort of your home. Dry air in winter makes skin itchy, eyes sore, and can even crack your furniture. If you want to add moisture to every room, joining a humidifier to your furnace is the smart move. But many homeowners worry this job is too hard or risky. Let me assure you: with the right plan, some care, and a little patience, you can do it. I’ve helped friends and family with this project, and learned a few lessons myself along the way. In this guide, I’ll show you exactly how to connect a humidifier to your furnace, step by step, in clear, simple English. Even if you’re not a pro, you can get this done safely.
Why Connect A Humidifier To Your Furnace?
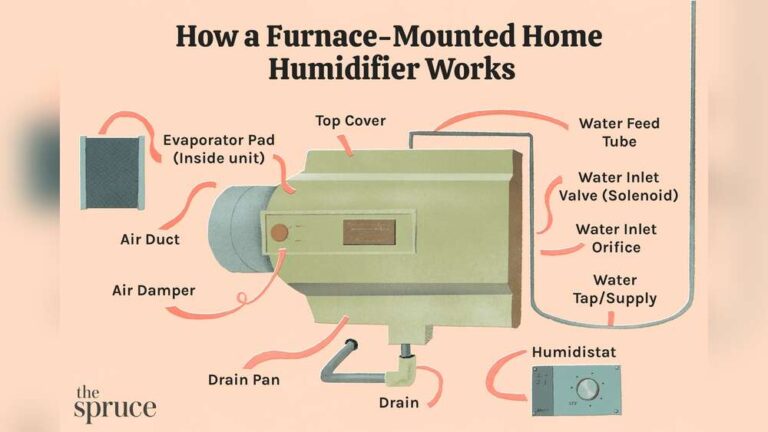
A furnace humidifier adds moisture to the air in your home using your heating system’s ductwork. This means every room gets balanced humidity, not just one. Here are the top reasons homeowners make this upgrade:
- Better health: Proper humidity (30–50%) helps prevent dry skin, sore throats, and allergies.
- Protects your home: Wood floors and furniture last longer with stable moisture.
- Energy savings: Humid air feels warmer, so you may use less heat.
- Whole-home coverage: Unlike small units, a furnace humidifier helps every room.
One winter, my own house felt like a desert. Static shocks were everywhere, and my daughter’s eczema flared up. After installing a humidifier on our furnace, those problems faded away within a week. The whole family noticed the difference.
Types Of Furnace Humidifiers
Before you start, you should know there are a few main humidifier types that can connect to a furnace:
| Type | How It Works | Best For | Maintenance |
|---|---|---|---|
| Bypass | Uses furnace airflow to move air through a water pad | Homes with easy duct access | Replace pad yearly |
| Fan-powered | Has its own fan to push air through the humidifier | Homes with less duct space | Replace pad yearly |
| Steam | Heats water to make steam, then sends it into the ducts | Large homes or very dry climates | Clean tank often |
Bypass humidifiers are most common and budget-friendly. Fan-powered units work well if you can’t fit a bypass model. Steam humidifiers are the most powerful, but they cost more and need more care.
Tools And Materials Needed
Here’s what you’ll usually need for this job:
- The humidifier kit (with manual)
- Drill with metal bits
- Tin snips (for cutting sheet metal)
- Screwdrivers (Phillips and flathead)
- Adjustable wrench
- Level
- Sheet metal screws
- Water supply line (usually 1/4” copper or plastic)
- Saddle valve (for water line)
- Humidistat (controls humidity)
- Electrical tape and wire nuts
- Flexible duct (if needed)
- Silicone caulk or sealant
Some kits include everything. Read the box and manual to check before you start.
Planning Your Installation
Before you cut or drill, plan your setup:
1. Pick The Right Spot
Most humidifiers mount on the supply (hot air) or return (cold air) duct near your furnace. The manual will say which is best for your model. Make sure you have:
- Enough space for the unit and cover
- Room for wires and water lines
- A nearby electrical outlet (for fan or steam models)
2. Turn Off Power And Water
Safety first: Turn off the furnace at the main switch or breaker. Shut off the main water supply too. I once forgot this step and ended up with a wet basement—save yourself the headache.
3. Read The Manual
Even if you’re handy, each humidifier has its own steps. Reading the manual prevents mistakes and saves time later.
Step-by-step Installation Guide
Now let’s walk through the actual process. I’ll use a bypass humidifier as the main example, since it’s most common. Steam units are more complex and may need a pro.
1. Trace And Cut The Mounting Hole
Tape the included template to the duct (where the manual says). Use a level to keep it straight. Trace around the template with a marker.
With your drill, make a starter hole in the outline. Then, cut carefully with tin snips. Wear gloves—sheet metal edges are sharp.
2. Attach The Humidifier
Fit the humidifier body into the hole and secure it with screws. Make sure it’s tight and sealed. If there are gaps, add silicone caulk to stop air leaks.
3. Install The Bypass Duct (if Needed)
Bypass units need a short flexible duct between supply and return. Cut a hole in the other duct, attach the collar, then connect the duct with clamps or screws.
4. Connect The Water Supply
Most humidifiers use a saddle valve to tap into a cold water pipe. Here’s how:
- Place the valve on the pipe (copper or plastic).
- Tighten it until the piercing needle touches the pipe.
- Turn the handle to pierce, then back out to open flow.
- Attach the water line to the valve, then to the humidifier.
If you have PEX or other modern pipes, check your kit—some valves don’t work on all pipes.
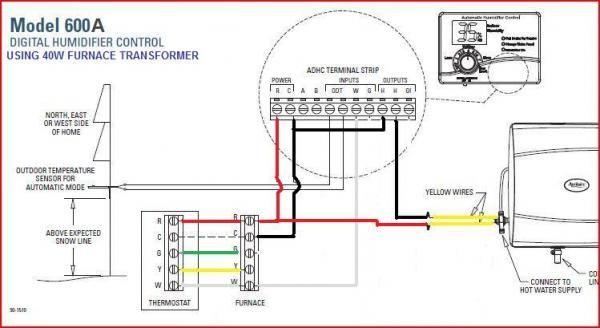
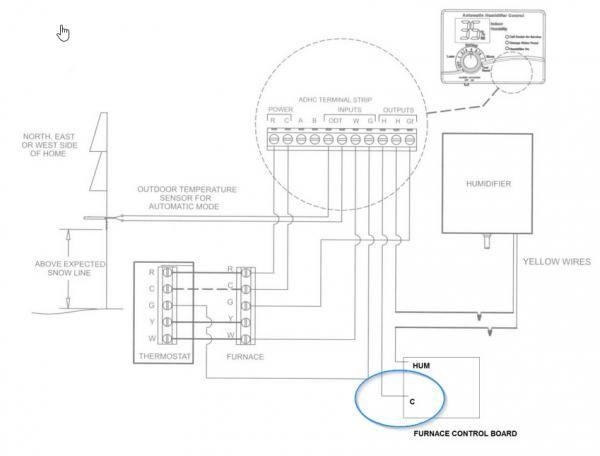
5. Wire The Humidistat
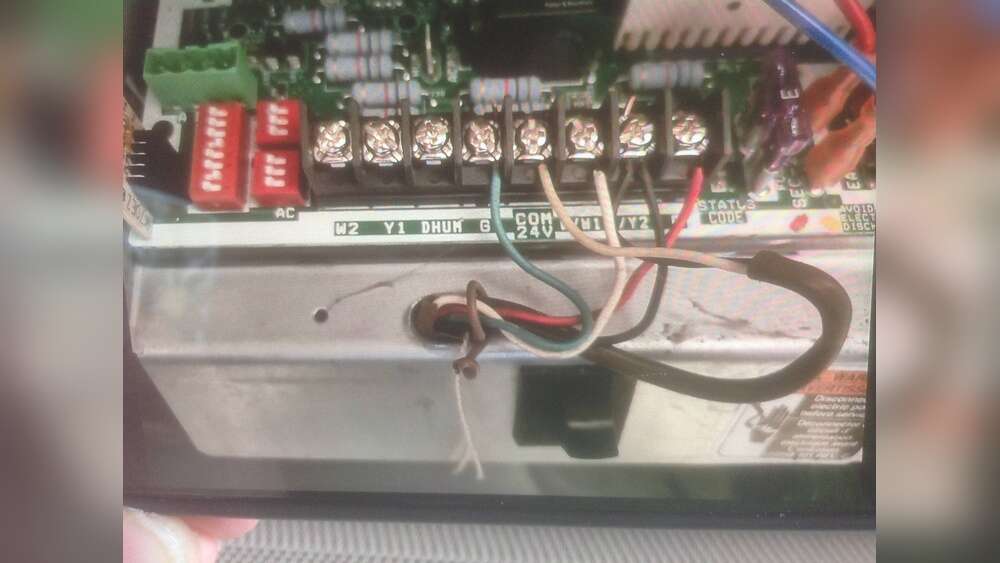
The humidistat controls how much moisture the humidifier adds. Most mount on a wall or duct. Connect the wires from the humidistat to the humidifier and, if needed, to the furnace control board. Use the wiring diagram in your manual.
Some systems can connect to your thermostat, but this is more advanced.
6. Hook Up Electrical Power (if Needed)
Fan-powered and steam units need power. You may have to plug into a nearby outlet or wire into the furnace’s 24V circuit. Follow the instructions closely. If you’re not sure, ask an electrician.
7. Connect The Drain Line
Most models need a drain line to get rid of extra water. Run a plastic tube from the humidifier to a floor drain or utility sink. Make sure it slopes downward so water doesn’t back up.
8. Double Check All Connections
Go over every screw, wire, and pipe. A loose connection can cause leaks or electric shorts. Take your time. This step is worth it.
9. Restore Power And Water
Turn the water supply back on. Then, switch the furnace power back on. Watch for leaks or sparks. If everything is dry and quiet, you’re ready for testing.
10. Test Your Humidifier
Set the humidistat to 35–45%. Turn on the heat. The humidifier should start when the furnace blower runs. Check for:
- Water flow into the unit
- No leaks at any joints
- The humidifier pad getting wet (for bypass/fan models)
- Steam (for steam units)
It’s normal for the humidifier to run only when the heat is on.
Common Mistakes And How To Avoid Them
From my own work and helping neighbors, I’ve seen a few traps people fall into. Here are the big ones—and how to dodge them.
- Not sealing the duct: Air leaks lower efficiency and spread dust. Always use caulk or foil tape.
- Cross-threading water lines: Go slow when tightening fittings, or you’ll get leaks.
- Skipping the drain line: Excess water can flood your furnace. Never leave this step out.
- Wrong humidistat placement: If it’s too close to a vent, readings will be off. Place it at least 6 feet from vents.
- Ignoring electrical codes: Some models need a dedicated circuit. Don’t guess—ask a pro if unsure.
- Not replacing pads/filters: Dirty pads breed mold. Set a reminder to change them every year.
One year, I helped a friend who forgot the drain. The humidifier overflowed, and we had to mop up gallons of water. Lesson learned: always check the drain before finishing.
Maintenance Tips For Long-term Performance
A humidifier needs care to work well and stay safe. Here’s how to keep yours in top shape:
- Change the water pad or panel each fall. Old pads block water and breed germs.
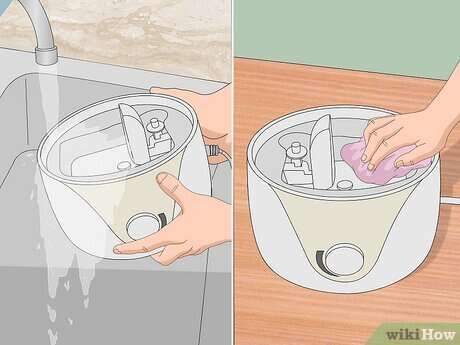
- Clean the unit with vinegar. Once a year, unplug the humidifier, take out the pad, and wipe all parts with white vinegar.
- Check for leaks every month. Tiny leaks can grow fast, so be alert.
- Inspect the water line and valve. Make sure nothing is loose or dripping.
- Test the humidistat. Set it higher or lower and see if the unit responds.
If you have hard water, consider a filter or softener. Mineral buildup is the main reason humidifiers fail early.
Comparing Furnace Humidifiers: Which One Should You Choose?
Some people ask which type is “best.” The answer depends on your home, budget, and climate. Here’s a quick comparison to help:
| Feature | Bypass | Fan-Powered | Steam |
|---|---|---|---|
| Cost | Low | Medium | High |
| Ease of Install | Easy | Medium | Hard |
| Water Use | Medium | Medium | Low |
| Best For | Small/medium homes | Medium homes | Large homes, dry areas |
| Noise | Low | Medium | Low |
If you have a typical home and want simple upkeep, a bypass or fan-powered model is usually perfect. If you live in a large house or very dry climate, steam might be worth the extra cost.
Safety Tips And When To Call A Pro
Most handy homeowners can install a bypass humidifier in half a day. But there are times when you should call a licensed expert:
- If your furnace is under warranty—some brands require pro install
- If you see mold or rust in the ducts
- If you’re not comfortable with wiring or plumbing
- If you need to cut into gas or high-voltage lines
When in doubt, a quick call to a local HVAC company can save you a lot of trouble. You can also find reliable installation tips at the U.S. Department of Energy.
Real-world Experience: What I Learned
The first time I installed a humidifier, I followed the manual step by step. But I made one big mistake: I didn’t check if my furnace had enough room for the unit. I had to shift some ductwork and spend an extra hour making it fit. Since then, I always measure twice before starting.
Another tip: set a calendar reminder to change the pad every fall. It’s easy to forget, but this keeps your air clean and your system running smooth.
Signs Your Humidifier Is Working (or Not)
After you install the humidifier, you want to be sure it’s doing its job. Here’s what to look for:
- No more static shocks: This is often the first sign.
- Comfortable skin and lips: No more cracking or dryness.
- No water on windows: Too much humidity causes condensation. If you see this, lower the humidistat.
- Furnace runs smoothly: If you hear odd noises or see water around the furnace, turn it off and check all connections.
If you’re not sure, you can buy a cheap humidity gauge (hygrometer) at any hardware store. Place it in a main room and check for 30–50% readings.
Cost Breakdown: What To Expect
Connecting a humidifier to your furnace is a smart investment, but what will it cost? Here’s a typical price range:
| Item | Low Cost | High Cost |
|---|---|---|
| Humidifier unit | $120 | $800 |
| Extra parts (valves, tubing) | $15 | $50 |
| Professional installation | $200 | $700 |
| Annual maintenance | $10 | $40 |
Most homeowners spend about $250–$500 for a basic bypass model, including parts. Steam units cost more, but can save on heating bills in very dry climates.
Credit: www.doityourself.com
Troubleshooting: Fixing Common Problems
Sometimes things don’t go as planned. Here are quick fixes for the most common issues:
- No water flow: Check the saddle valve and make sure it’s open. Look for kinks in the water line.
- Humidifier won’t turn on: Confirm the power is on. Check the wiring to the humidistat and furnace.
- Leaks at joints: Tighten fittings and use plumber’s tape if needed.
- Furnace short cycles: The humidistat might be wired wrong—double-check the diagram.
If you smell burning or see sparks, shut down the system and call a pro right away.
Practical Tips For A Smooth Project
To make your installation easier, remember these extra tips:
- Label every wire before disconnecting anything, so you can put them back right.
- Take clear photos of the furnace wiring before you start.
- Lay out all parts on the floor so you see what you have.
- Have a helper if possible—holding ductwork or pipes is tricky alone.
- Work in daylight—it’s safer and you’ll spot problems faster.
Credit: www.doityourself.com
Frequently Asked Questions
What Humidity Level Should I Set My Humidifier To?
Most experts recommend 30–50% relative humidity. In winter, 35–45% is comfortable and safe for most homes. Too much can cause mold and window condensation.
Can I Install A Furnace Humidifier Myself?
Yes, if you’re comfortable with basic tools and following directions. Bypass and fan-powered models are DIY-friendly. Steam models are best left to pros because of high-voltage wiring.
How Often Should I Clean Or Replace The Humidifier Pad?
Once a year is standard for most pads. If you have hard water, you may need to change it twice a year to prevent mineral buildup.
Will A Humidifier Raise My Heating Bill?
Not usually. In fact, proper humidity makes you feel warmer, so you may lower your thermostat and save money. Steam humidifiers use more power, but the effect is small in most homes.
What Are Signs My Humidifier Isn’t Working Right?
Watch for dry air symptoms (static shocks, dry skin), no water flow into the unit, leaks, or water on windows. A humidity gauge can help you track the levels.
Adding a humidifier to your furnace is one of the best ways to improve your home’s comfort and health in winter. With careful planning, the right tools, and a bit of patience, you can handle this project yourself. Remember to measure twice, seal every joint, and keep up with yearly maintenance.
If you run into trouble, don’t be afraid to call a pro—your comfort and safety are worth it. With your new humidifier running, you’ll notice softer air, fewer colds, and a cozier home all season long.
:max_bytes(150000):strip_icc()/anatomy-of-the-home-furnace-humidifier-1824773color-d41575bdba834fd59ac29178949a1e2a.png)
Credit: www.thespruce.com